
Swift: Initialising a 2D Array
I have a struct called Tile, which has (for now) a position defined as a tuple:
struct Tile {
    let pos: (Int, Int)
}
And a class called Board, which has a 2D array of Tile objects:
class Board {
    let tiles: [[Tile]]

    init() {
        var tilesArray = [[Tile]]()
        for row in 0..<Board.rows {
            var rowTiles = [Tile]()
            for column in 0..<Board.columns {
                let tile = Tile(pos:(column, row))
                rowTiles.append(tile)
            }
            tilesArray.append(rowTiles)
        }

        tiles = tilesArray
    }
}
This works, though it feels a little messy... I'll have to come back and look at this again.
Xcode 7 and Swift 2: Unit Testing (again)
Some follow up from creating a new project and adding tests.
This turned out to be important...
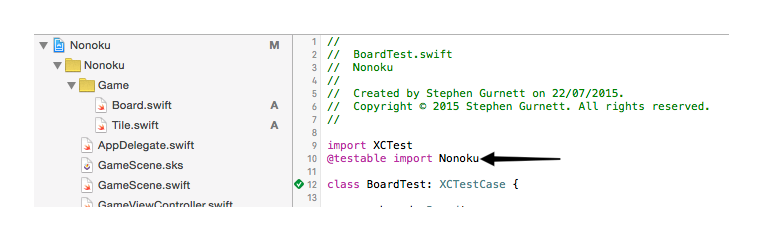
I hadn't really noticed in the last one but I hadn't added the new classes to the test target, as I would under Obj-C. In Swift 2 there's a new @testable keyword. I found it blogged by Natasha the Robot when I started looking to find out why I wasn't seeing any code coverage showing up for my classes.
Then I started wondering why I was getting Undefined Symbol errors. I could resolve them by including the classes, but then I wouldn't get coverage and everything I saw on @testable assured me I didn't need to include them. Finally, I remembered I'd been getting a bit click happy earlier. I'd disabled Allow testing Host Application APIs.

One checkbox later and I'm a happy camper...

Okay, not a lot done tonight but I feel like a few pieces fell into place.
Xcode 7: Unit Test Coverage
To enable code coverage, first enable 'Gather coverage data' for your scheme.

Run your tests then check the coverage report:

I've got some work to do...
NSInvocation - Calling Blocks
Because I always forget.
    id mockView = OCMClassMock([UIView class]);

    [[[[mockView stub] ignoringNonObjectArgs] andDo:^(NSInvocation *invocation) {
        __block void (^animationBlock)(void);
        [invocation getArgument:&animationBlock atIndex:3];
        animationBlock();
        __block void (^completionBlock)(BOOL);
        [invocation getArgument:&completionBlock atIndex:4];
        completionBlock(YES);

}] animateWithDuration:0 animations:OCMOCK_ANY completion:OCMOCK_ANY];Unity - Generating Builds
Adding the below code to Assets/Editor will add an entry to the menu bar that allows me to generate two builds automatically. Since they're also placed in a folder with the day's date, I also get build histories for the work done. For GameJams this is ideal as I'll usually only get a small amount of time on an evening to work on these so I'm not doing much more (and I could always use a more precise timestamp if needed). This is basic but so easy to automate and a nice little time saver that I thought I'd share.
using UnityEditor;
using System.Diagnostics;
using System;

public class JamBuilds
{
    [MenuItem("Build/Jam Builds")]
    public static void BuildGame () {
        // Get filename.
        string path = EditorUtility.SaveFolderPanel("Choose Location of Built Game", "", "");
        string[] levels = new string[] {"Assets/Scenes/Test.unity", "Assets/Scenes/Finale.unity"};
        string projectName = PlayerSettings.productName;

        string date = DateTime.Now.ToString("/yyyy-MM-dd");

        // Build player.
        BuildPipeline.BuildPlayer(levels, path + date + "/" + projectName + ".exe", BuildTarget.StandaloneWindows, BuildOptions.None);

        // Build player.
        BuildPipeline.BuildPlayer(levels, path + date + "/WebPlayer", BuildTarget.WebPlayer, BuildOptions.None);

    }
}And There Went My Resolve
Sometime around doing my first Game Jam I stopped posting regular updates. I'm not entirely surprised but I am a little disappointed in myself. Anyway, since the last post was at the start of this month, I am going to try and get a couple more in, if only because I've managed another Game Jam release and a quick Unity port of an earlier game I made to talk about.
And for kicks:
In all honesty, the alcohol probably belongs at the start, as well as the finish ;)
Xcode Plugins
Install the Alcatraz (http://alcatraz.io) package manager to get these.
https://github.com/neonichu/BBUFullIssueNavigator
Shows the whole error/warning in the issue navigator instead of a single line.
https://github.com/yuhua-chen/MCLog
Allows you to filter the console by a regular expression.
https://github.com/markohlebar/Peckham
Add imports from anywhere in the code base - press Cmd+Ctrl+P to pop up a window which has autocompletion for your headers.
https://github.com/onevcat/VVDocumenter-Xcode
Fill in a quick documentation template.
https://github.com/kinwahlai/XcodeRefactoringPlus
Additional refactoring tools. Still not as full-featured as some IDEs but it's a case where every little helps.

An Evening of Code: Elevator
A distraction. Took a few minutes just to implement a basic mechanic. Not sure what this is to do with anything but into the Experiments/ dir it goes.
The elevator has a collision box and, when the player touches it we can activate the 'elevator' functionality on a keypress. The system allows up and down movement so you could have multiple floors.

An Evening of Code: Generating Roads 2
Fixed a couple of bugs which was keeping the generation from truly finishing which makes increasing the frequency of the branches more feasible. I tweaked the previous generation to increase how often it branched as it approaches the centre. It's still way to messy and chaotic to be a workable solution but for something so basic and naive it actually does better than I expected.

An Evening of Code: Generating Roads
Very first version. Supports branching and snapping. Roads have a semi-random angle and then a random jitter for the direction. No real control or guidance so this is only a starting point. Still doing some reading around this kind of thing so this is more to get something down rather than a firm decision as to how/if I want to go forward with this.

An Evening of Code: Stacks and Plants
Added support for pushing and popping the current state of a node (position and angle). That allows for branching which means that plants are now possible.
Refining Terrain
Tweaking values - went a little high on the mountain frequency.
Refining it down. Kind of fun to jump around right until you fall to the bottom ;)
That's more like it!

The 9th iteration of the Sierpinski triangle.
An Evening of Code: Sierpinski Triangle
An extension of yesterday's work with L-Systems. The Sierpinski Triangle.
Firstly, I updated the implementation to draw the shape over a number of frames. This is not the end goal of this work so I'm doing it in Unity by drawing to a texture which is easy to implement but far from the most efficient ;) In this case it was best to limit the texture size to 512x512 to avoid a severe performance hit when redrawing the texture. If I needed to, I could simulate a larger texture by mapping it to multiple smaller ones but that's out of scope for the moment.
Next I updated the rules implementation to support multiple rules. Previously I used a single string and a regular expression. This no longer worked because the rules have to be applied simultaneously. Instead, I used a Dictionary to store the rules and, since the rules I need at the moment are only applied to a single character I could simply enumerate the axiom and use the character as the key to the dictionary. If there's a match I append the rule to a new string. If not I append the character.
There is one additional change that is not described in the notation - after each iteration the angle gets flipped so that it goes from 60 to -60, and back again. This is required to keep the triangle facing the same way at each iteration.
A= Step forward
B = Step forward
+ = +60 degrees
- = -60 degrees
A → B-A-B
B → A+B+A
Axiom: A
After 9 iterations the string has gone from 1 to 39,365 characters.
string Iterate(string axiom) {
  string newAxiom = "";
  foreach (char c in axiom) {
    string ch = c.ToString();
    string replace = null;
    rules.TryGetValue(ch, out replace);
    if (replace != null) {
      newAxiom += replace;
    } else {
      newAxiom += ch;
    }
  }

  angle = -angle;
  Debug.Log ("Axiom Length: " + newAxiom.Length);
  return newAxiom;
}

void FixedUpdate() {
  int length = axiom.Length;

  for (int i = 0; i < 200; i++) {
    if (index < axiom.Length) {
      char c = axiom[index];
      if (c == 'F' || c == 'A' || c == 'B') {
        Vector2 newPoint = NewPoint(currentPoint, stepLength, angle);
        DrawLine (new Line(currentPoint, newPoint), colors[colIndex % 3]);
        colIndex++;
        currentPoint = newPoint;
      } else if (c == '-') {
        angle -= angleStep;
      } else if (c == '+') {
        angle += angleStep;
      }
      index++;
    }
  }
  texture2D.Apply();
}

An Evening of Code: Koch Snowflake
The Koch Snowflake is the one of the first, and simplest, of the fractals.
Starting with an equilateral triangle:
- Start at the first line and remove it.
- Set the step length by dividing the line length by 3.
- Set the angle to that of the line.
- Step forward.
- Rotate 60 degrees left.
- Step forward.
- Rotate 120 degrees right.
- Step forward.
- Rotate 60 degrees left.
- Step forward.
In total, we've added four new lines and increased the total length of the shape by 1/3. Repeat for the remaining lines and we have completed an iteration. Starting again on the new shape we can repeat the same steps for each of the new lines. As can be seen from the above animation, which only iterates 5 times, the complexity rapidly increases.
Technically this is not actually a Koch Snowflake as that is the shape we approach as we iterate. However, we would need to iterate an infinite number of times to generate a true Snowflake.
Iterating on a single line generates a Koch Curve. The Snowflake, starting from a triangle, is made of three curves.
The Koch Curve can be described by a Lindenmayer (L-) System. This is where we create a string and, each iteration, run a set of rules to replace characters in the string with others. Each character defines a drawing rule which we can follow to draw the shape after the iterations have completed.
F = Step Forward
+ = Rotate 60 degrees right
- = Rotate 60 degrees left
Rules
F → F-F++F-F
Starting with: F++F++F++
Our drawing instructions give us our starting triangle. Iterating, we increase the size of the string and generate more rules. Following them generate the animation above.
float stepLength = 256;
string rule = "F-F++F-F";
Vector2 start = new Vector2(128, 128);

protected override void Draw () {
  string axiom = "F++F++F++";
  for (int i = 0; i < 5; i++) {
    axiom = Iterate(axiom);
  }

  int index = 0;
  Color[] colors = new Color[3]{Color.black, Color.red, Color.blue};
  int length = axiom.Length;

  Vector2 currentPoint = start;
  float angle = 0;
  int colIndex = 0;
  while(index < axiom.Length) {
    char c = axiom[index];
    if (c == 'F') {
      Vector2 newPoint = NewPoint(currentPoint, stepLength, angle);
      DrawLine (new Line(currentPoint, newPoint), colors[colIndex % 3]);
      colIndex++;
      currentPoint = newPoint;
    } else if (c == '-') {
      angle -= 60;
    } else if (c == '+') {
      angle += 60;
    }
    index++;
  }
}

string Iterate(string axiom) {
  Regex regex = new Regex("F");
  stepLength /= 3;

  return regex.Replace(axiom, rule);
}

Vector2 NewPoint(Vector2 point, float step, float angle) {
  float radAngle = angle * Mathf.Deg2Rad;
  float x1 = (point.x + (step * Mathf.Cos(radAngle)));
  float y1 = (point.y + (step * Mathf.Sin(radAngle)));

  return new Vector2(x1, y1);
}
Try modifying the above to generate new shapes. For example, replacing the '+' with '-' symbols in the starting axiom will create the equilateral triangle facing in the other direction and which starts a different pattern which will never exceed the bounds of the initial equilateral triangle.

An Evening of Code: Drawing a Line
Not hugely exciting but I did also spend a little time cleaning up an old project. Didn't end up doing as much as I thought was needed so instead I started looking at ways to start learning L-systems. To begin, I'll need a way to get them on the screen. For the first go I figured being able to draw lines to a texture would be sufficient. This is a quick and dirty implementation of Bresenham's line algorithm. I don't need it to be fast so substituted floats for the bit shifting just to make it easy. Nothing to be proud of here but it does get me what I need for tonight.
public void DrawLine(int x0, int y0, int x1, int y1, Color color) {
  int dy = y1 - y0;
  int dx = x1 - x0;
  float error = 0;
  float deltaError = 0;
  if (dx != 0 && dy != 0) {
    deltaError = Mathf.Abs((float)dy / (float)dx);
  }

  int y = y0;
  int x = x0;
  for (int i = 0; i < Mathf.Abs(dx); i++) {
    texture2D.SetPixel(x, y, color);
    error = error + deltaError;
    while (error >= 0.5f) {
      texture2D.SetPixel (x, y, color);
      y += Mathf.RoundToInt(Mathf.Sign(dy));
      error = error - 1.0f;
    }
    x += Mathf.RoundToInt(Mathf.Sign(dx));
  }
}
LinkDump: L-Systems
http://en.wikipedia.org/wiki/L-system
http://algorithmicbotany.org/papers/abop/abop-ch1.pdf
https://graphics.ethz.ch/Downloads/Publications/Papers/2001/p_Par01.pdf
http://www.citygen.net/files/citygen_gdtw07.pdf
For later follow up. I've got some other things to check offline as well. I'll put up a more thorough post when I've had chance to look through them some more.

An Evening of Code: Simplex Noise and Mesh Building
On advice from the tutorials out there I've moved to using Simplex noise. It also now creates two layers of noise so that we can have dirt on top of the stone.
Probably the biggest single change is that chunks now generate a mesh, rather than instantiating a cube for each voxel. This is (unsurprisingly) a lot faster and actually allows me to have stacks of blocks.
Creating a mesh in Unity is pretty straightforward. Specify four Vector3s and define as two triangles to form a square face. Use 6 square faces to form a cube.
// Top Face
Vector3[] vertices = new Vector3[4];
vertices[0]  = new Vector3 (x,  y,  z + 1);
vertices[1] = new Vector3 (x + 1, y,  z + 1);
vertices[2] = new Vector3 (x + 1, y,  z );
vertices[3] new Vector3 (x,  y,  z );

// Triangles
int[] triangles = new int[6];   // Two triangles, 3 points each, 2 verts are shared
triangles[0] = 0;
triangles[1] = 1;
triangles[2] = 2;
triangles[3] = 0;
triangles[4] = 2;
triangles[5] = 3;

mesh.Clear();
mesh.vertices = vertices;
mesh.triangles = triangles;
mesh.Optimize();
mesh.RecalculateNormals();

col.sharedMesh = mesh;  // Use render mesh for collisions
A simple optimisation then is to check if there is another cube adjacent. Since there is no gap we don't need to include the face on that side.
Lastly, track the block type and assign the appropriate texture.
It's lacking a lot of features that would make it a game. I might look into some basic changes like supporting just because it's straightforward. Really though, this was to serve as a refresher in how to think about 3D and procedural content. In that, it's served its purpose.
Tools - Unity
It took a while but I think I'm finally feeling comfortable working in Unity.The other night I built a minimum viable prototype of one of my iOS games over the course over just a couple of hours. I feel like I'm still learning the flow of the engine, particularly with regards to threading, but there's a lot of power and potential to be tapped and getting started with it is easy. That said, I do miss the more advanced debugging tools I get with something like IntelliJ, or Xcode. And MonoDevelop is pretty awful ;)
An Evening of Code: Voxels and Terrain
Because sometimes you just have to rip off Minecraft.
Naive voxel based terrain generated using Perlin noise. Nothing too special, I just wanted to get a feeling for how it works. Quite satisfying to jump about and simple to implement. Terrain is generated in chunks and has colliders. It's not particularly fast to instantiate the chunks but this was just a 'getting things on the screen' type of experiment. There are plenty of tutorials on this and I'm sure I'll have a look before going much further but doing a bit upfront was a good learning process and a nice way to get thinking about 3D again. No particular plans for this but a fun change of pace.